Ricoh SP4510DN
Adjustment. Image Position
Note:
- Adjust the blank margin width only if it cannot be adjusted by registration (leading edge/side-to-side). First adjust C and D; then A and B.

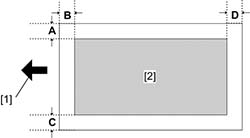
• [1]: Print area
• [2]: Paper feed direction
- Enter the SP mode, and then print the test pattern (17: Trim Area ) with SP2-109-001.
- Adjust the blank margin width of the image with SP2-103-(001-004)
▪ Leading edge: 2.7 to 9.9 mm (Default: 3.0 mm)
▪ Trailing edge: 0.0 to 9.9 mm (Default: 2.0 mm)
▪ Left: 0.0 to 9.9 mm (Default: 2.0 mm)
▪ Right: 0.0 to 9.9 mm (Default: 2.0 mm)
Registration Adjustment
Print Area
Check that the adjustment meets the product specification
• [1]: Paper feed direction
• [2]: Print area
Adjustment Reference Values
- B: Leading edge (Sub scanning direction): 3.0 ± 1.5 mm
- D: Trailing edge (Sub scanning direction): 3.0 mm
- C: Left (Main scanning direction): 2.0 ± 1.5 mm
- A: Right (Main scanning direction): 2.0 mm
Adjustment Procedure
- Enter the SP mode, and then print the test pattern (17: Trim Area) with SP2-109-001.
Print the test pattern, and then adjust the leading edge registration in the SP mode to the optimum value. - Do SP1-002-(001,002,003,004,006) to check and adjust the registration.
- Check the side-to-side registration for each paper feed tray