Toshiba e-Studio 202S
Simulation Mode. 1 Entering
To enter the serviceman simulation mode, press the keys as follows:
Clear → Exposure select → Clear → Exposure select
To cancel the simulation mode, press the clear key.
Operation panel
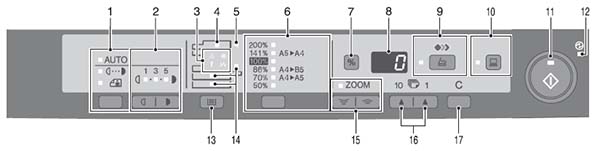
| 1 | Exposure mode selector key and indicators Use to sequentially select the exposure modes: AUTO, MANUAL or PHOTO. Selected mode is shown by a lit indicator. |
2 | Light and dark keys and indicators Use to adjust the MANUAL or PHOTO exposure level. Selected exposure level is shown by a lit indicator. Use to start and terminate user program setting. |
| 3 | Alarm indicators Developer replacement required indicator Misfeed indicator Toner cartridge replacement required indicator *1 Maintenance indicator |
4 | ADF indicator (Only when the ADF is installed.) |
| 5 | ADF misfeed indicator (Only when the ADF is installed.) | 6 | Copy ratio selector key and indicators Use to sequentially select preset reduction/enlargement copy ratios. Selected copy ratio is shown by a lit indicator. |
| 7 | Copy ratio display (%) key
|
8 | Display Displays the specified copy quantity, zoom copy ratio, user program code, and error code. |
| 9 | SCAN key and indicator *2, *3 | 10 | ONLINE key and indicator Lights up when the unit is used as a printer and scanner. *2 |
| 11 | Start key and indicator
|
12 | Power save indicator Lights up when the unit is in a power save mode. |
| 13 | Tray select key Use to select a paper feed station (paper tray or multi-bypass tray). |
14 | Paper feed location indicators Light up to show the selected paper feed station. |
| 15 | ZOOM keys and indicator Use to select any reduction or enlargement copy ratio from 25% to 400% in 1% increments. (When the ADF is being used, the zoom copy ratio range is 50% to 200%.) |
16 | Copy quantity keys
|
| 17 | Clear key
|
*1: Toner cartridge replacement
When toner density is lower than a specified level, the toner cartridge replacement indicator lights up to warn the user. If the toner cartridge is not replaced in that time, the ready lamp changes to blinking and then start to supply the toner after around 10 copies. (Cartridge replacement lamp continues to light.) If toner density is not back to specific level after two minutes, the ready indicator goes out and toner developer indicator starts blinking, and the copier stops. Also when the toner quantity is insufficient, the lamp is lighted.
*2: Indicators on the operation panel
The ONLINE indicator and the start ( ) indicator indicate the state of the printer or scanner.