Ricoh MPC5504ASP
Service Program Mode. Overview
Types of SP Modes
• System SP: SP modes related to the engine functions
• Printer SP: SP modes related to the controller functions
• Scanner SP: SP modes related to the scanner functions
• Fax SP: SP modes related to the fax functions
Select one of the Service Program modes (System, Printer, Scanner, or Fax) from the touch panel as shown in the diagram below after you access the SP mode. This section explains the functions of the System/Printer/Scanner SP modes. Refer to the Fax service manual for the Fax SP modes.

SP Mode Button Summary
Here is a short summary of the touch-panel buttons.
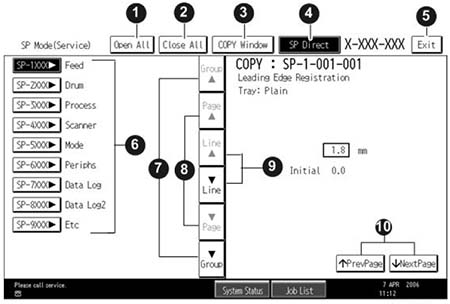
1 Opens all SP groups and sublevels.
2 Closes all open groups and sublevels and restores the initial SP mode display.
3 Opens the copy window (copy mode) so you can make test copies. Press SP Mode (highlighted) in the copy window to return to the SP mode screen,
4 Enter the SP code directly with the number keys if you know the SP number. Then press . (The required
SP Mode number will be highlighted when pressing . If not, just press the required SP Mode number.)
5 Press two times to leave the SP mode and return to the copy window to resume normal operation.
6 Press any Class 1 number to open a list of Class 2 SP modes.
7 Press to scroll the show to the previous or next group.
8 Press to scroll to the previous or next display in segments the size of the screen display (page).
9 Press to scroll the show the previous or next line (line by line).
10 Press to move the highlight on the left to the previous or next selection in the list.
Switching Between SP Mode and Copy Mode for Test Printing
1. In the SP mode, select the test print. Then press "Copy Window".
2. Use the copy window (copier mode), to select the appropriate settings (paper size, etc.) for the test print.
3. Press [Start] key to start the test print.
4. Press SP Mode (highlighted) to return to the SP mode screen and repeat from step 1.
Selecting the Program Number
Program numbers have two or three levels.
- Refer to the Service Tables to find the SP that you want to adjust before you begin.
- Press the Group number on the left side SP Mode window that contains the SP that you want to adjust.
- Use the scrolling buttons in the center of the SP mode window to show the SP number that you want to open. Then press that number to expand the list.
- Use the center touch-panel buttons to scroll to the number and title of the item that you want to set and press it. The small entry box on the right activates and shows the below default or the current settings.
- Do this procedure to enter a setting:
• Press to toggle between plus and minus and use the keypad to enter the appropriate number. The number you enter writes over the previous setting.
• Press [#] to enter the setting. (The value is not registered if you enter a number that is out of range.)
• Press "Yes" when you are prompted to complete the selection. - If you need to perform a test print, press Copy Window to open the copy window and select the settings for the test print. Press [Start] key and then press SP Mode (highlighted) in the copy window to return to the SP mode display.
- Press Exit two times to return to the copy window when you are finished.
Service Mode Lock/Unlock
At locations where the machine contains sensitive data, the customer engineer cannot operate the machine until the Administrator turns the service mode lock off. This function makes sure that work on the machine is always done with the permission of the Administrator.
- If you cannot go into the SP mode, ask the Administrator to log in with the User Tool and then set "Service Mode Lock" to OFF after he or she logs in: User Tools → System Settings → Administrator Tools → Service Mode Lock →OFF
• This unlocks the machine and lets you get access to all the SP codes.
• The CE can service the machine and turn the machine off and on. It is not necessary to ask the Administrator to log in again each time the machine is turned on. - Go into the SP mode and set SP5169 to "1" if you must use the printer bit switches.
- After machine servicing is completed:
• Change SP5169 from "1" to "0".
• Turn the machine off and on. Tell the administrator that you have completed servicing the machine.
• The Administrator will then set the "Service Mode Lock" to ON.