Ricoh MP3351
Troubleshooting. Correcting Skewed Images
1. Test pattern (Trimming Pattern) mode check
Is the image skewed?
Yes:
1. Adjust the side fences. There must be no gap between the fences and the paper stack.
2. Adjust the paper buckle: SP1-003-1 and 2.
2. Platen mode check
Set an original flush against the left and rear scales and make a copy.
Does the image come out as a parallelogram?
Yes:
Attach the Scanner Holder (a supporter that is normally attached during shipping) OR Do Procedure A below.
3. ADF mode check
Feed an original through the ADF.
Is the image skewed?
Yes:
Do the front and rear transport rollers feed the original straight?
Yes:
Change the position of the right hinge screw to the longer hole, and make small position adjustments that are necessary.
No:
Do Procedure B below.
Procedure A
- Remove the rear and left covers, then the left scanner cover.

- Check to see if there is a gap between the scanner unit holder and frame at [A].
- If there is no gap, the left front section of the scanner unit is lower than the standard position.
- Loosen all screws [B].
- Lift up the left front of unit until there is a 1 to 2 mm gap.
- Tighten the 7 screws.
- Insert a washer (#07080050, 1 mm thick) into gap [A].
- Attach the washer in its position with an adhesive that sets quickly.
• This washer will also absorb small amounts of shock. - Check if the parallelogram image still appears.
Procedure B
- Remove the ADF [A], machine rear cover, scanner left cover, and scanner rear cover.
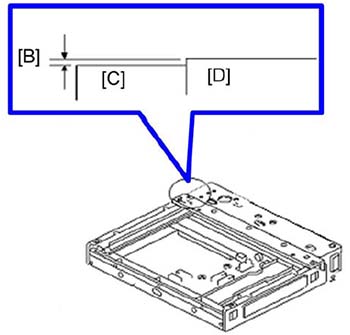
- Measure the height difference [B] between the hinge bracket [C] and scanner housing [D].
- If the difference is 0.5 mm or more:
Add a spacer (t = 0.5 to 0.8) between the hinge bracket (mainframe) and ADF left hinge, to lift the left side of the ADF
-or-
Adjust the stepped height difference between the hinge bracket and scanner housing until it is within 0 ±0.3 mm.
• This is necessary because skew occurs when the hinge bracket more than 0.3 mm lower than the scanner housing.