Ricoh D0AF MPC5504exASP Met-C2.1d
Adjustment. Erase Margin, Tone of the Printed Image
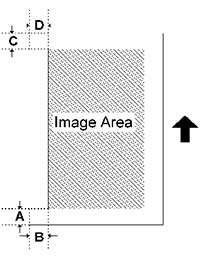
Erase Margin Adjustment
Note:
• Adjust the erase margin C and D only if the registration (main scan and sub scan) cannot be adjusted within the standard values. Do the registration adjustment after adjusting the erase margin C and D, and then adjust the erase margin A and B.

- Enter SP2-109-003.
- Print out the test pattern (14: Trimmed area) with SP2-109-003.
- Check the erase margin A and B. Adjust them with SP2-103-001 to -015 if necessary.
• Leading edge: 0.0 to 9.0 mm (default: 4.2 mm)
• Side-to-side: 0.0 to 9.0 mm (default: 2.0 mm)
• Trailing edge: 0.0 to 9.0 mm (default: 4.2 mm)
Adjusting the Tone of the Printed Image
If a customer wishes to have the tone of the printed image corrected, you can adjust it as follows. For details about the adjustment procedures, see the corresponding sections.
| Adjustment Method | Outline |
|---|---|
| Adjustment by Changing the Printer Driver Setting | Perform this to adjust the tone for each print job. This can be adjusted by the user. |
| Adjustment by Changing the Machine’s Profile Setting | Perform this to make the tone similar to that of another model. Doing this changes the tone of all images printed by the machine’s printer function. |
| Adjustment by Printer Gamma Correction | Basically, we recommend the default setting. Doing this changes the tone of all images printed by the machine’s printer function. |