Lexmark 7464-036 MX721ade
Troubleshooting. Print quality. Blank or white pages check
Note: Before performing this print quality check, go to the control panel home screen and navigate to Settings > Troubleshooting > Print Quality Test Pages, and then perform the initial print quality check.
| Actions | Yes | No |
|---|---|---|
| Step 1 Check if the printer is using a genuine and supported Lexmark toner cartridge. Note: If the printer is using a third‑party cartridge, then refer the users to their cartridge supplier. Is the printer using a genuine and supported toner cartridge? |
Go to step 3. | Go to step 2. |
| Step 2 Install a genuine and supported toner cartridge. Does the problem remain? |
Go to step 3. | The problem is solved. |
| Step 3 a Check and remove any packing material left on the imaging unit. b Firmly shake the imaging unit to redistribute the toner, and then reinstall it. Does the problem remain? |
Go to step 4. | The problem is solved. |
| Step 4 Check the imaging unit for damage and proper installation, and replace if necessary. Does the problem remain? |
Go to step 5. | The problem is solved. |
| Step 5 Check the transfer roller for proper installation. Is the transfer roller properly installed? |
Go to step 7. | Go to step 6. |
| Step 6 Reinstall the transfer roller. |
Go to step 7. | The problem is solved. |
| Step 7 Check the transfer roller for surface contamination and damage. Is the transfer roller free of contamination and damage? |
Go to step 8. | Go to step 14. |
| Step 8 a Remove the right cover. b Check all the connections on the HVPS for proper connection. Is the HVPS properly connected? |
Go to step 10. | Go to step 9. |
| Step 9 Replace the connections. Does the problem remain? |
Go to step 10. | The problem is solved. |
| Step 10 Reseat connection J15 on the controller board. Does the problem remain? |
Go to step 11. | The problem is solved. |
| Step 11 Replace the connection. Does the problem remain? |
Go to step 12. | The problem is solved. |
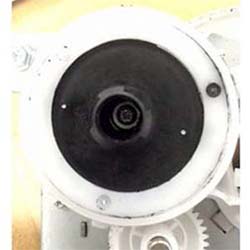
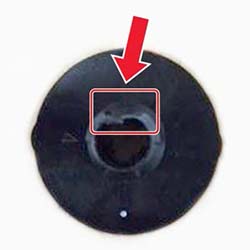
Step 12 a Check the coupler for signs of damage. The coupler is located on the main motor drive of the printer. • Good condition
• Bad condition
If the coupler is damaged, then replace the main motor drive. |
Go to step 13. | The problem is solved. |
| Step 13 Reseat the cable J71 on the controller board. |
Go to step 14. | The problem is solved. |
| Step 14 Replace the transfer roller. |
Go to step 15. | The problem is solved. |
| Step 15 Replace the laser printhead Does the problem remain? |
Contact the next level of support. | The problem is solved. |