Konica-Minolta bizhub C3851
Firmware. USB memory. Updating
• There are two ways to update the firmware: One is by directly connecting with the main body using the USB memory device, and the other is by downloading over a network using the Internet ISW.
NOTE
- The settings in the "Utility" mode and the "Service Mode" will not be changed, when the firmware is updated.
- Activate the loadable device driver and voice data as required in the order shown below in accordance with the rewriting firmware or user's environment.
1. [Service Mode] -> [System 2] -> [Install Data]
2. [Service Mode] -> [System 2] -> [Driver Install]
3. Turn OFF and ON the main power switch.
Confirming the firmware version
- Call the Service Mode to the screen.
- Select the [Firmware Version].
- Check the current firmware version.
NOTE
• After conducting firmware updating, check the firmware version No. and confirm that the firmware has been normally updated.
System preparation
- PC with USB ports
- USB memory
NOTE
• Possible to be non-operational products.
• USB flash memory compatible with the USB (1.1/2.0/3.0) interface. The speed is limited to USB2.0 specifications even if using a device that supports USB3.0.
• The USB memory is formatted in FAT32 format.
• No security functions such as encryption and password lock have been added (or the USB memory allows its security functions to be turned OFF).
• A USB memory that is recognized by the computer as two or more drives cannot be used.
• We recommend that you use a memory device with no more than 32 GB of capacity.
USB memory used to update firmware
- Uncompress the firmware file.
- Connect the USB memory to the PC, and copy the extracted data ''FW0006'' to the root directory of the USB memory.
NOTE
- More than one firmware data with a single model can be stored in the USB memory.
- In this case, copy the firmware data to the USB memory according to the following procedures.
1. Make the folder named "FWSelect" (case-sensitive) to the root directory of the USB memory.
2. Make a folder with any folder name (one byte alphameric characters, maximum 40 characters) under "FWSelect" folder, and store the firmware data to the folder.
Procedure
- Turn OFF the main power switch.
- Connect the USB memory containing the firmware into the USB port on the right side of the operation panel.
NOTE
• USB memory must be connected with the main power switch off. - Turn the main power switch ON while pressing the Stop key.
NOTE
• When [Administrator Settings] -> [Security Settings] -> [USB Connection Permission setting] -> [External Memory (Service)] -> [FW Update] is set to "Restrict", a message "It is limited by the administrator." will appear, and update of the firmware cannot be executed.
• When [Administrator Settings] -> [Security Settings] -> [FW Update (USB) Perm. Sett.] is set to "Password Priority", it requires to input a password after confirming with the administrator. - Control panel shows F/W items to be updated, and select the particular type of F/W to be updated. (Select [YES].)
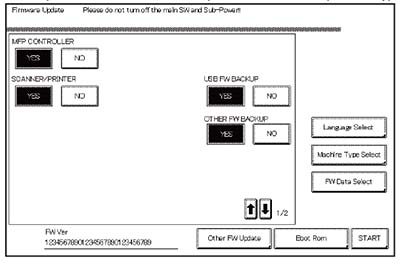
F/W to be updated Appropriate board Remark MFP CONTROLLER eMMC board (eMMC) SCANNER/PRINTER MFP board (MFPB) FAX BOARD CONTROLLER1 Fax board/1 (FAXB/1) Only when FK-517 is mounted NOTE
• Unless one of the keys on the control panel is pressed, firmware is automatically updated after 30 seconds when the main power switch is turned on.
• When the Boot Rom file is in the firmware data, [Boot Rom] key is displayed. Pressing the key updates data.
• If either or both of the SCB file and power sub CPU file are contained within the firmware data, the [Other FW Update] key displays. Press the key to update.
• When more than one firmware are stored in step 1, pressing [FW Data Select] enables selection. (Data of other models cannot be selected.) (At this time, the data marked with an asterisk on the upper-left side of the data selection screen is the firmware data in the ''FW0006'' folder in the USB memory device.) - Press the [Language Select].
- On the Language Select screen, select a language to be displayed on the LCD area of the control panel, then touch [Fix].
NOTE
• The language selected on this screen is displayed on the Language Selection screen of Utility.
• Up to 9 languages are selectable. However, Japanese and English are essential options - Touch [OK] to go back to the firmware update selection screen.
- Press the [START]. (At this time, the Start key starts blinking red.)
NOTE
• The progress ratio of each board is displayed in writing the program. - Check that the control panel shows the message indicating that the data has been rewritten correctly ([Downloading Completed]). (The Start key lights blue.)
- Turn OFF the main power switch.
- Remove the USB memory.
- Turn ON the main power switch.
- Call the Service Mode to the screen.
- Select the [Firmware Version].
- Make sure if the version of firmware is updated.
Action when data transfer fails
• If “NG” appears on the control panel, indicating that rewriting has been unsuccessful (in which case the Start key lights up red), take the following steps.
- Perform the data rewriting procedure again.
- If the procedure is abnormally terminated, change the USB memory for a new one and try another rewriting sequence.
- If the procedure is still abnormally terminated, change the board that has caused “NG” and carry out data rewriting procedure.