Canon imageRUNNER Advance DX 4735i
Troubleshooting. Remedies E602 or E614 error is displayed
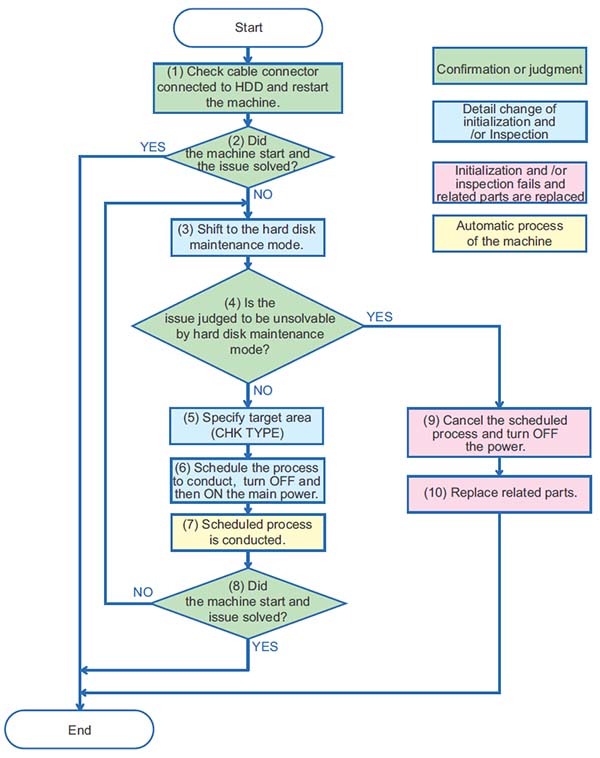
Remedy procedure for E602 or E614 differs according to the status of the screen where error is displayed. Check the remedy procedure by referring to the following flow chart.

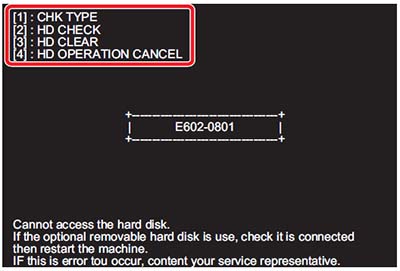
Execute a remedy described in service mode by referring to "Error / Jam / Alarm" in the Service Manual. If an error code and a message is displayed on a black screen (as above), shift to the hard disk maintenance mode referring to the Flow Chart 2 and execute the remedy described in Error / Jam / Alarm" in the Service Manual.
CAUTION:
Numbers in the Flow Chart 2 are corresponding to the procedure numbers. Check the remedy procedure by referring to the flow chart.
1. Check cable connector connected to the hard disk and restart the machine.
2. Check if the machine is started normally. If the machine is started normally, the analysis is complete.
3. If the machine is not started normally, execute key operation to shift to the service mode for shifting to hard disk maintenance mode.
4. Determine if the issue is solved in the hard disk maintenance mode.
• Proceed to 5 for diagnosis for the first time or trying to restore with the hard disk maintenance mode.
• If the issue cannot be solved by hard disk maintenance (HD-CHECK/HD-CLEAR is not executed or issue unsolved even executed), proceed to 9.
5. Press "1" of Numeric Keypad, then two digits number to specify the target area (CHK TYPE).
CAUTION:
The CHK - TYPE to be specified needs to be entered in two digits even the number to be specified is one digit. Enter "01" to specify "1" and enter "04" to specify "4". For example, in the case of the above display (E602-0801), specify No. 8 because Partition No. 8 is in error. (Enter the number as "08") If you made a mistake, press "1" again then enter two digits number.
6. Specify and schedule the process stated as a remedy for error code by referring to the Flow chart No.6, "Error / Jam / Alarm" in the Service Manual. Then turn OFF and then ON the main power of the machine.
• To schedule disk check (COPIER > FUNCTION > SYSTEM >HD-CHECK), select [2]:HD-CHECK.
• To schedule formatting (COPIER / FUNCTION / SYSTEM /HD-CLEAR), select [3]:HD CLEAR.
NOTE:
When the menu [2] to [4] is selected, key cannot be re-entered. If you made a wrong selection, Turn OFF and then ON the main power of the machine, shift to hard disk maintenance mode and specify again.
7. Scheduled process is automatically executed.
8. If the process is complete and the machine is restarted normally, analysis is complete.
The same black screen and the error code is displayed, shift back to the hard disk maintenance mode and conduct other maintenance.
9. Consider the HDD cannot be restored, select [4] and cancel the schedule. Switch OFF the main power of the machine.
CAUTION:
Replacing HDD without canceling the schedule causes the scheduled process is executed to replaced HDD at the next normal startup. When replacing parts, specify [4] to cancel the schedule.
10. Refer to the Service Manual to replace the related parts.
NOTE:
Related parts for E602
• Harness between main controller PCB and the HDD
• HDD
• Main Controller PCB
Related parts for E614
• Flash PCB
• Main Controller PCB