Canon i-SENSYS MF525x
Troubleshooting. Checking the Amount of Fixing Nip
Although the nip width of the Fixing Assembly cannot be adjusted with this machine, it can be checked. By checking the nip width when fixing failure occurs, it is possible to judge whether there is a problem with the Fixing Assembly. Check the nip width of the Fixing Assembly by the following procedure.
- 1. In the following service mode, print solid black using A4/LTR size paper.
• TESTMODE > PRINT > PG-TYPE = 2
• TESTMODE > PRINT > START - Load the printed paper with the solid black side facing up in a cassette of the machine.
- In the following service mode, print solid white.
• TESTMODE > PRINT > PG-TYPE = 3
• TESTMODE > PRINT > START - When the leading edge of the paper comes out to the Delivery Outlet, open the Front Cover to cause a door open jam and then close the Front Cover immediately.
CAUTION:
Since pressure is released by opening the Front Cover, accurate fixing nip width cannot be measured while keeping the Front Cover opened. - About 20 seconds afterwards, open the Front Cover and remove the jammed paper.
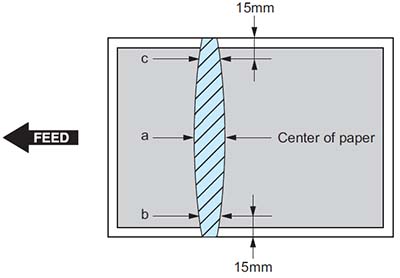
- Measure the widths of the glossy part of the toner on the printed paper, and check that they are within the range as follows.
• Check if the fixing nip width satisfies the reference values shown below. Fixing nip width (reference value): Center (a) = 6.7 +/- 1.0 mm, Edges (b and c) = 6.2 +/- 1.0 mm
• Check if the values "a - b", "b - c", and "a - c" are 1.5 mm (reference value) or less.
If either of the above conditions are not satisfied, fixing failure may occur.