-
Catalog
-
Sign In
-
Contacts
-
Forum
-
Eng
Brother MFC-L2732DW
Troubleshooting. Image defect 2
Completely blank
User Check
- Replace the drum unit with a new one.
- Replace the toner cartridge with a new one.
- Install the latest main firmware.
| Step |
Cause |
Remedy |
| 1 |
Connection failure of the laser unit flat cable |
Reconnect the laser unit flat cable. |
| 2 |
Laser unit attachment failure |
Reattach the laser unit. |
| 3 |
Laser unit flat cable failure |
Replace the laser unit flat cable. |
| 4 |
Dirt on the electrodes of the high-voltage power supply PCB and those of the machine |
Clean the electrodes of the high-voltage power supply PCB and those of the machine. |
| 5 |
Laser unit failure |
Replace the laser unit. |
| 6 |
Main PCB failure |
Replace the main PCB ASSY. |
Image distortion
| Step |
Cause |
Remedy |
| 1 |
Laser unit attachment failure |
Reattach the laser unit. |
| 2 |
Laser unit failure |
Replace the laser unit. |
| 3 |
Main PCB failure |
Replace the main PCB ASSY. |
All black
User Check
- Clean the corona wire of the drum unit.
- Replace the drum unit with a new one.
| Step |
Cause |
Remedy |
| 1 |
Dirt on the electrodes of the drum unit and those of the machine |
Clean the electrodes of the drum unit and those of the machine. |
| 2 |
Laser unit flat cable failure |
Replace the laser unit flat cable. |
| 3 |
Dirt on the electrodes of the high-voltage power supply PCB and those of the machine |
Clean the electrodes of the high-voltage power supply PCB and those of the machine. |
| 4 |
High-voltage power supply PCB failure |
Replace the high-voltage power supply PCB ASSY. |
| 5 |
Laser unit failure |
Replace the laser unit. |
| 6 |
Main PCB failure |
Replace the main PCB ASSY. |
Dirt on back side of paper
User Check
- This problem may disappear after printing multiple sheets of paper.
- Replace the drum unit with a new one.
| Step |
Cause |
Remedy |
| 1 |
Dirt in the paper feed system |
Wipe dirt off. |
| 2 |
Dirt on the fuser unit |
Replace the fuser unit. |
| 3 |
High-voltage power supply PCB failure |
Replace the high-voltage power supply PCB ASSY. |
Vertical streaks
User Check
- Clean the corona wire of the drum unit.
- Return the corona wire cleaning tab to the “▲” position.
- This problem may disappear after printing multiple sheets of paper.
- Refer to <How to clean the drum unit> to remove the dirt from the exposure drum using a cotton applicator.
- Replace the drum unit with a new one.
- Replace the toner cartridge with a new one.
| Step |
Cause |
Remedy |
| 1 |
Dirt in the paper feed system |
Wipe dirt off. |
| 2 |
A ground wire or ground plate installation failure (Grounding is not performed correctly.) |
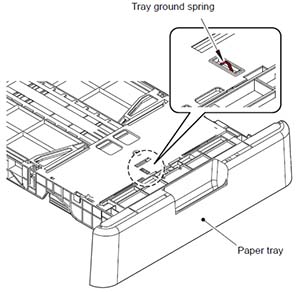
Retighten the screws of each ground wire or ground plate. Repair the bend of the tray ground spring of the paper tray. (Refer to the figure below.) |
| 3 |
Dirt on the exposure drum |
Perform drum cleaning.
(Refer to “2.1 Drum Cleaning” in Chapter 5.) |
| 4 |
Dirt on the cleaner pinch roller of the fuser cover |
Replace the cleaner pinch roller S ASSY. |
| 5 |
Dirt on the fuser unit |
Replace the fuser unit. |
| 6 |
Laser unit failure |
Replace the laser unit. |