Lexmark XM1242
Troubleshooting. Print quality. Solid black pages check
Note: Before performing this print quality check, go to the control panel home screen and navigate to Settings > Troubleshooting > Print Quality Test Pages, and then perform the Initial print quality check.
| Actions | Yes | No |
|---|---|---|
| Step 1 Check if the printer is using a genuine and supported Lexmark toner cartridge. Note: If the printer is using a third‑party cartridge, then refer the users to their cartridge supplier. Is the printer using a genuine and supported toner cartridge? |
Go to step 3. | Go to step 2. |
| Step 2 Install a genuine and supported toner cartridge. Does the problem remain? |
Go to step 3. | The problem is solved. |
| Step 3 a Remove any packing material left on the imaging unit, including the red separator plastic (A). Note: You may need a pair of pliers to remove a piece of broken plastic inside the imaging unit. b Check the charge roller contact (B) on the right side of the imaging unit for damage and contamination. Is the charge roller contact damaged and contaminated? |
Go to step 4. | Go to step 5. |
| Step 4 Repair or replace the charge roller contact on the imaging unit. Does the problem remain? |
Go to step 5. | The problem is solved. |
| Step 5 Replace the imaging unit. Does the problem remain? |
Go to step 6. | The problem is solved. |
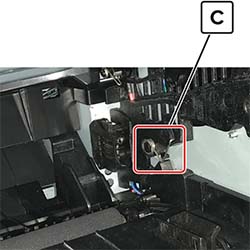
Step 6 Check if the imaging unit contact (C) is contaminated, broken, or bent out of proper position.
Is the contact contaminated, broken, or bent out of proper position? |
Go to step 7. | Go to step 8. |
| Step 7 Clean or repair the imaging unit contacts. Does the problem remain? |
Contact the next level of support. | The problem is solved. |
| Step 8 Check the high voltage metal contacts on the imaging unit for damage. If necessary, replace the imaging unit. Does the problem remain? |
Go to step 9. | The problem is solved. |
| Step 9 Check cable JPS1 from the controller board to the power supply for proper connection. Is the cable properly connected? |
Go to step 11. | Go to step 10. |
| Step 10 Reseat the cable. Does the problem remain? |
Go to step 11. | The problem is solved. |
| Step 11 Replace the cable. Does the problem remain? |
Contact the next level of support. | The problem is solved. |