Xerox Phaser 3010
Service Mode. Sensor Test Procedures WorkCentre 3045
The following Digital Input procedures test each print engine sensor using Service Diagnostics. When a paper jam occurs, or an error message or code is displayed, execute these tests to isolate the problem.
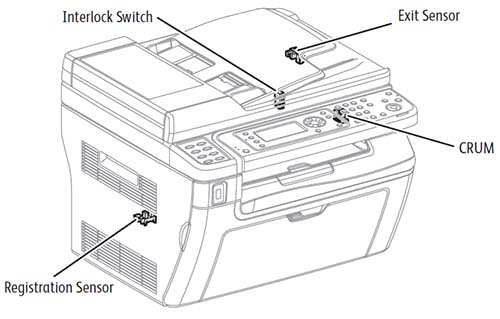
- Exit Sensor
- Registration Sensor
- Rear Door Interlock Switch
- K CRUM
Note
Pressing the Cancel button stops the sensor tests. Press the Back button to go back to the Engine Diag menu.
During sensor tests, other diagnostic functions can not be performed simultaneously. The printer only accepts operations for the DI components and exit of the sensor tests. Parameters for the Digital Input tests are as shown in the following table.
DI-3 K CRUM
DI-4 Exit Sensor
DI-5 Registration Sensor
DI-7 Rear Door Interlock Switch
Toner Cartridge CRUM
- Enter Service Diagnostics.
- Open the Front Door.
- Use the Up and Down Arrow buttons to select Printer > IOT Diag > DI-3.
- Check sensor function by removing and replacing the Toner Cartridge.
- Confirm the number shown on the display increases each time the toner cartridge is removed.
- Press the Stop button to stop the test.
Exit Sensor
- Enter Service Diagnostics
- Use the Up and Down Arrow buttons to select Printer > IOT Diag > DI-4.
- Operate the actuator to check sensor function.
- Confirm the number shown on the display increases every time the actuator is operated.
- Press the Stop button to stop the test.
Registration Sensor
- Enter Service Diagnostics
- Open the Rear Door.
- Use the Up and Down Arrow buttons to select Printer > IOT Diag > DI-5.
- Operate the actuator to check sensor function.
- Confirm the number shown on the display increases every time the actuator is operated.
- Press the Stop button to stop the test.
Rear Door Interlock
- Enter Service Diagnostics
- Use the Up and Down Arrow buttons to select Printer > IOT Diag > Digital Input > DI-7.
- Open and close the Rear Door to actuate the switch.
- Confirm the number shown on the display increases every time the actuator is operated.
- Press the Stop button to stop the test.
- Close the Rear Door.