Brother MFC-L2732DW
Troubleshooting. Image defect 4
White spots on image
User Check
- Check that the fan is not clogged.
- Refer to <How to clean the drum unit> to remove the dirt from the exposure drum using a cotton applicator.
- Replace the drum unit with a new one.
- Replace the toner cartridge with a new one.
| Step | Cause | Remedy |
|---|---|---|
| 1 | Dirt on the paper dust cleaning roller of the paper tray | Clean the paper dust cleaning roller. |
| 2 | Dirt on the exposure drum | Perform drum cleaning. |
| 3 | Clogged filter | Clean the filter. |
| 4 | Scratch or dirt on the fuser unit | Replace the fuser unit. |
| 5 | High-voltage power supply PCB failure | Replace the high-voltage power supply PCB ASSY. |
Note:
Image defects which appear periodically may be caused by failure of rollers. Refer to the table below and determine the cause based on the pitch at which defects appear on the image.
Pitches on images caused by rollers
| Part name | The pitch which appears in the image |
|---|---|
| Develop roller | 26.5 mm |
| Exposure drum | 94.5 mm |
| Heat roller of the fuser unit | 78.5 mm |
| Pressure roller of the fuser unit | 78.5 mm |
Examples of image distortion
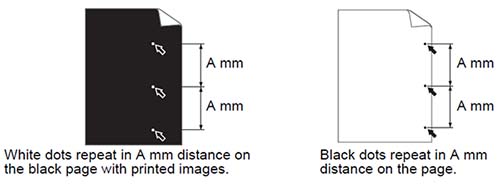
Refer to the <Pitches on images caused by rollers> table above for what represents the value A
Spots or dirt
User Check
- Check if damp paper is used.
- Refer to <How to clean the drum unit> to remove the dirt from the exposure drum using a cotton applicator.
- Replace the drum unit with a new one.
- Replace the toner cartridge with a new one.
| Step | Cause | Remedy |
|---|---|---|
| 1 | Dirt on the paper dust cleaning roller of the paper tray | Clean the paper dust cleaning roller. |
| 2 | Dirt on the exposure drum | Perform drum cleaning. |
| 3 | Clogged filter | Clean the filter. |
| 4 | Scratch or dirt on the fuser unit | Replace the fuser unit. |
| 5 | High-voltage power supply PCB failure | Replace the high-voltage power supply PCB ASSY. |
Note:
Image defects which appear periodically may be caused by failure of rollers. Refer to <Pitches on images caused by rollers> and determine the cause based on the pitch at which defects appear on the image.
Band
User Check
- Clean the corona wire of the drum unit.
- Clean the corona wire by sliding the green tab of the drum unit to the left end.
- This problem may disappear after printing multiple sheets of paper.
- Refer to <How to clean the drum unit> to remove the dirt from the exposure drum using a cotton applicator.
- Replace the drum unit with a new one.
- Replace the toner cartridge with a new one.
| Step | Cause | Remedy |
|---|---|---|
| 1 | A ground wire or ground plate installation failure (Grounding is not performed correctly.) | Retighten the screws of each ground wire or ground plate. Repair the bend of the tray ground spring of the paper tray. |
| 2 | Dirt on the exposure drum | Perform drum cleaning. |
| 3 | Laser unit failure | Replace the laser unit. |
How to clean the drum unit (the shape of the drum is different from the actual one
(1) Remove the toner cartridge from the drum unit. Turn the drum unit as shown in the illustration. Make sure that the drum unit gear is on the left side.
(2) Use the numbered markers next to the drum roller to find the mark on the drum. For example, a dot in column 2 on the check sheet means that there is a mark in drum region “2”.
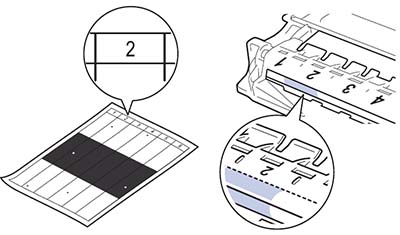
(3) Turn the edge of the drum unit towards you while looking at the drum surface to find the mark.

(4) Wipe the surface of the drum gently with a dry cotton swab until the mark or foreign material on the surface comes off.
Note: Do not clean the exposure drum surface with anything sharp like a ball pointed pen.